Introduction
In this lesson, we will cover how to set up a Unity patcher using the Coffee Auto Patcher with your own server instead of Amazon S3. We will use a server from OVH.com for this purpose. This lesson assumes that you have already completed the setup of Apache, a subdomain, and an SSL certificate on your server.
Requirements
- An OVH.com VPS server with Apache installed (any VPS or host will work)
- Subdomain configured with SSL for patch distribution
- Unity project for the patcher setup
Step 1: Generate the File List
-
Substep 1.1: Prepare the Unity File List Generator Project
Before generating the file list, ensure your Unity File List Generator project is properly set up:
- Open Unity and load your project.
- If you have not already created a scene for the patcher, go to
File > New Sceneto create a new one. - Save the new scene by going to
File > Save As...and name it appropriately, such as “File List Generator – Windows.”
Substep 1.2: Add the File List Generator Script
If the
File List Generatorscript is not present in your editor, you need to add it:- In the Unity Editor, go to the
Assetsfolder. - Look for the Coffee Auto Patcher package scripts. If you can’t find them, ensure that you have imported the Coffee Auto Patcher package into your project via the Unity Asset Store or your purchased package.
- Once you have located the Coffee Auto Patcher scripts, find the
File List Generatorscript.
Substep 1.3: Create and Configure the File List Generator
- In the Unity Editor, right-click in the
Hierarchywindow and selectCreate Emptyto create a new GameObject. - With the new GameObject selected, click on
Add Componentin theInspectorwindow. - In the search bar of the window that pops up, type “File List Generator” and add the script to the GameObject.
- Select the GameObject that now has the File List Generator script attached.
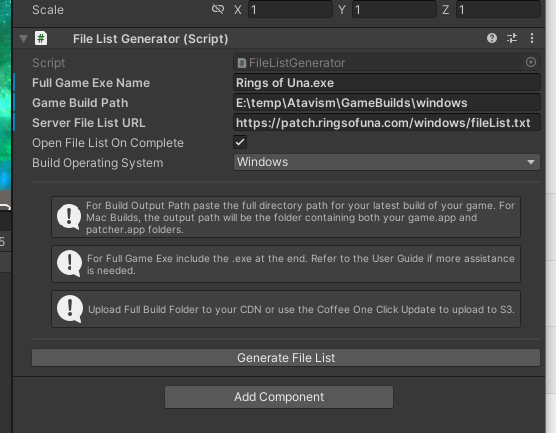
Substep 1.4: Set Up the File List Generator Parameters
- With the GameObject selected, fill in the parameters in the
Inspectorwindow:Full Game Exe Name: The name of your game executable, for example,MyGame.exe.Game Build Path: The local path to your current game build, such asC:\MyGame\Builds\Windows.Server File List URL: The full URL where yourfileList.txtwill be hosted, e.g.,https://patch.mygamedomain.com/windows/fileList.txt.
- Choose the appropriate
Build Operating Systemfor your game.
Substep 1.5: Generate and Review the File List
- Click on the
Generate File Listbutton to create the list of files. - Once generated, the
fileList.txtshould appear in the specified game build path. In the example below it will appear in the windows folder in E:\temp\Atavism\GameBuilds\windows\filesList.txt - Review the
fileList.txtto ensure all necessary files for the patch are listed.
Step 2: Upload to Your Server using WinSCP
Substep 2.1: Install WinSCP
WinSCP is a popular free SFTP and FTP client for Windows that uses SSH and is known for its ease of use when transferring files between a local and a remote computer.
- Visit the WinSCP download page and download the installation package.
- Run the installer on your Windows machine and follow the instructions to install WinSCP.
Substep 2.2: Connect to Your Server with WinSCP
- Open WinSCP. The ‘Login’ window will appear upon launching.
- In the ‘File Protocol’ dropdown, select ‘SFTP’ or ‘FTP’ depending on what your server supports.
- Enter your server’s IP address or domain name in the ‘Host name’ field.
- Type in the port number. The default is 22 for SFTP or 21 for FTP.
- Enter your username and password for the server. If your server uses a key file for authentication, click on ‘Advanced…’ and under ‘SSH’, navigate to ‘Authentication’ to add your private key file.
- Click on ‘Login’ to connect to your server. If this is your first time connecting, you may receive a security alert about the server’s host key; you can accept it to continue.
Substep 2.3: Transfer Files with WinSCP
- Once connected, you’ll see two main panels. The left panel represents your local computer, and the right panel represents your remote server.
- Navigate to the local directory where your
fileList.txtand game build folder are located on the left panel. - On the right panel, navigate to the directory where you want to upload these files on your server.
- Select the
fileList.txtand the entire game build folder on the left panel. - Drag and drop them into the right panel or right-click on the selected files and choose ‘Upload’.
- A transfer dialogue will appear, showing the progress of the file upload. Once the transfer is complete, your files will be on your server.
Tips for Using WinSCP
- Save your session details by clicking on ‘Save…’ before you log in, so you can quickly connect next time.
- Always ensure you’re uploading to the correct directory to avoid overwriting important files.
- Use WinSCP’s synchronization feature to keep your local and remote directories synchronized with the latest changes.
By following these steps, you should be able to securely and efficiently transfer your Unity game’s fileList.txt and build folder to your web server using WinSCP.
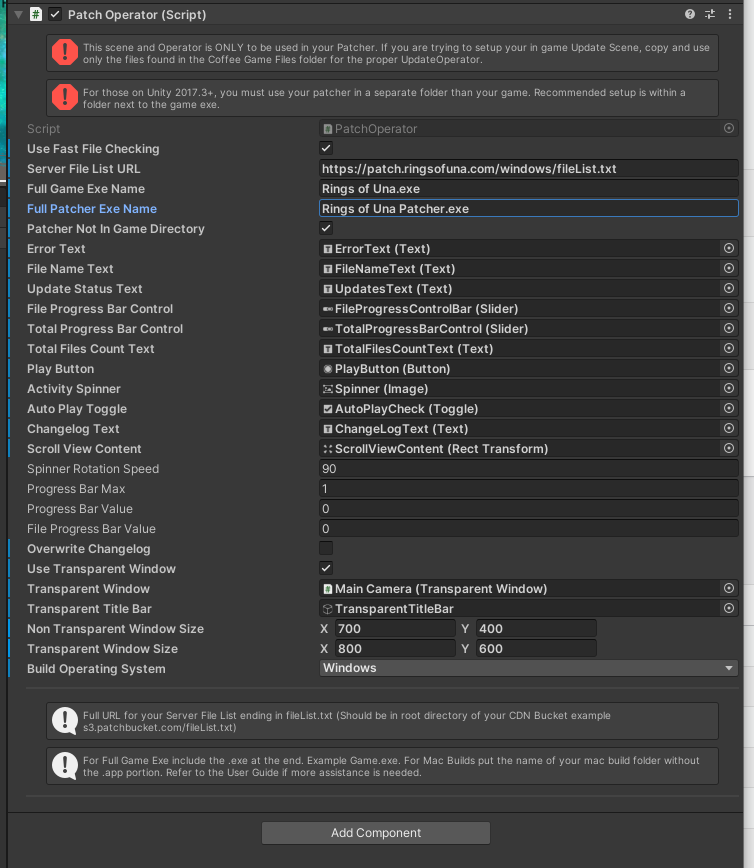
Step 3: Configure the Patch Operator
- In your Unity project, open the
Patch Operatorscript. - Set the
Server File List URLto the URL where yourfileList.txtis hosted. - Input the
Full Game Exe Nameand theFull Patcher Exe Name. Ensure theFull Patcher Exe Nameis set to the executable of the patcher, such asRings of Una Patcher.exe. - Confirm that the
Patcher Not In Game Directorybox is checked if your patcher is located in a separate directory from the main game. - Choose the
Build Operating SystemasWindowsif that is the platform you are targeting.
Step 4: Design the Patcher UI
- In the Unity editor, design the UI for your patcher within the scene.
- Customize the appearance of buttons, progress bars, and text fields.
- You may use RSS feeds to dynamically populate parts of the UI, like the changelog or updates text.
Tips and Tricks
- Utilize caching mechanisms on your server to handle multiple requests efficiently.
- Test your patcher thoroughly in a staging environment before rolling it out to production.
- Monitor your server load and bandwidth usage, especially after releasing a new patch.
Conclusion
By following these steps, you should have a fully functional Unity game patcher set up with the Coffee Auto Patcher system, using your own server. This setup allows you to maintain control over your patch distribution and avoid reliance on third-party services like Amazon S3. Remember to test your setup extensively to ensure a smooth update experience for your players.
References
- Enabling a New Subdomain in Apache2
- Installing and Configuring Apache2 for File Browsing and .htaccess Overrides
- Certbot
Next Steps
- Ensure you follow best practices for security on your web server.
- Consider implementing analytics to track update downloads and user engagement.
- Plan for scaling your server resources in case your game gains more players.